

How To Configure Wsus Server 2016 To Get Updates From Another Wsus Server
This browser is no longer supported.
Upgrade to Microsoft Edge to take advantage of the latest features, security updates, and technical support.
Deploy Windows client updates using Windows Server Update Services (WSUS)
Applies to
- Windows 10
- Windows 11
Looking for consumer data? See Windows Update: FAQ
WSUS is a Windows Server role available in the Windows Server operating systems. It provides a single hub for Windows updates within an organization. WSUS allows companies not only to defer updates merely also to selectively approve them, choose when they're delivered, and decide which private devices or groups of devices receive them. WSUS provides additional command over Windows Update for Business but does not provide all the scheduling options and deployment flexibility that Microsoft Endpoint Manager provides.
When you choose WSUS equally your source for Windows updates, you utilise Grouping Policy to point Windows client devices to the WSUS server for their updates. From there, updates are periodically downloaded to the WSUS server and managed, approved, and deployed through the WSUS assistants console or Grouping Policy, streamlining enterprise update direction. If you're currently using WSUS to manage Windows updates in your environment, you can continue to exercise so in Windows 11.
Requirements for Windows client servicing with WSUS
To exist able to use WSUS to manage and deploy Windows feature updates, yous must use a supported WSUS version:
- WSUS 10.0.14393 (part in Windows Server 2016)
- WSUS x.0.17763 (role in Windows Server 2019)
- WSUS 6.2 and half dozen.3 (role in Windows Server 2012 and Windows Server 2012 R2)
- KB 3095113 and KB 3159706 (or an equivalent update) must exist installed on WSUS half dozen.two and 6.3.
Important
Both KB 3095113 and KB 3159706 are included in the Security Monthly Quality Rollup starting in July 2017. This ways you lot might non encounter KB 3095113 and KB 3159706 every bit installed updates since they might have been installed with a rollup. Yet, if you need either of these updates, we recommend installing a Security Monthly Quality Rollup released later on October 2017 since they contain an boosted WSUS update to decrease memory utilization on WSUS's clientwebservice. If yous have synced either of these updates prior to the security monthly quality rollup, you can experience bug. To recover from this, see How to Delete Upgrades in WSUS.
WSUS scalability
To use WSUS to manage all Windows updates, some organizations may demand access to WSUS from a perimeter network, or they might accept some other complex scenario. WSUS is highly scalable and configurable for organizations of any size or site layout. For specific information about scaling WSUS, including upstream and downstream server configuration, branch offices, WSUS load balancing, and other circuitous scenarios, encounter Choose a Type of WSUS Deployment.
Configure automated updates and update service location
When using WSUS to manage updates on Windows customer devices, start by configuring the Configure Automatic Updates and Intranet Microsoft Update Service Location Grouping Policy settings for your surround. Doing then forces the affected clients to contact the WSUS server so that it can manage them. The following procedure describes how to specify these settings and deploy them to all devices in the domain.
To configure the Configure Automatic Updates and Intranet Microsoft Update Service Location Group Policy settings for your surround
-
Open Grouping Policy Management Console (gpmc.msc).
-
Aggrandize Wood\Domains\Your_Domain .
-
Right-click Your_Domain, and and so select Create a GPO in this domain, and Link it here.

Notation
In this example, the Configure Automated Updates and Intranet Microsoft Update Service Location Group Policy settings are specified for the entire domain. This is not a requirement; yous can target these settings to any security group by using Security Filtering or a specific OU.
-
In the New GPO dialog box, name the new GPO WSUS – Auto Updates and Intranet Update Service Location.
-
Right-click the WSUS – Auto Updates and Intranet Update Service Location GPO, and then click Edit.
-
In the Group Policy Management Editor, go to Computer Configuration\Policies\Administrative Templates\Windows Components\Windows Update.
-
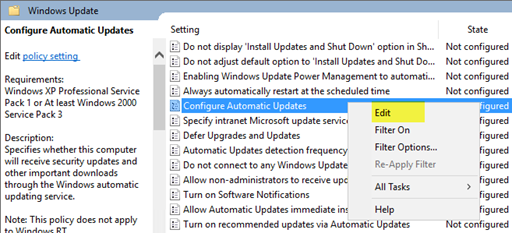
Right-click the Configure Automatic Updates setting, and then click Edit.
-
In the Configure Automatic Updates dialog box, select Enable.
-
Nether Options, from the Configure automated updating list, select iii - Auto download and notify for install, and then click OK.

Important
Use Regedit.exe to check that the post-obit fundamental is non enabled, considering information technology can interruption Windows Store connectivity: Estimator\HKEY_LOCAL_MACHINE\SOFTWARE\Policies\Microsoft\Windows\WindowsUpdate\DoNotConnectToWindowsUpdateInternetLocations
Notation
In that location are three other settings for automatic update download and installation dates and times. This is but the option this example uses. For more than examples of how to control automated updates and other related policies, see Configure Automatic Updates by Using Group Policy.
-
Right-click the Specify intranet Microsoft update service location setting, and then select Edit.
-
In the Specify intranet Microsoft update service location dialog box, select Enable.
-
Nether Options, in the Set the intranet update service for detecting updates and Fix the intranet statistics server options, type
http://Your_WSUS_Server_FQDN:PortNumber, and then select OK.Note
The URL
http://CONTOSO-WSUS1.contoso.com:8530in the post-obit epitome is just an case. In your environment, be certain to use the server name and port number for your WSUS instance.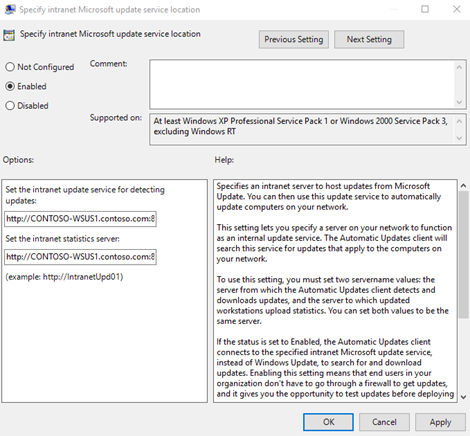
Annotation
The default HTTP port for WSUS is 8530, and the default HTTP over Secure Sockets Layer (HTTPS) port is 8531. (The other options are lxxx and 443; no other ports are supported.)
As Windows clients refresh their estimator policies (the default Grouping Policy refresh setting is xc minutes and when a estimator restarts), computers start to appear in WSUS. At present that clients are communicating with the WSUS server, create the computer groups that marshal with your deployment rings.
Create computer groups in the WSUS Administration Console
You lot can apply computer groups to target a subset of devices that accept specific quality and feature updates. These groups correspond your deployment rings, as controlled by WSUS. Yous can populate the groups either manually by using the WSUS Administration Console or automatically through Grouping Policy. Regardless of the method you choose, yous must first create the groups in the WSUS Administration Console.
To create computer groups in the WSUS Administration Console
-
Open up the WSUS Administration Panel.
-
Go to Server_Name\Computers\All Computers, and then click Add Computer Group.

-
Blazon Ring 2 Pilot Business Users for the proper name, and and so click Add.
-
Echo these steps for the Ring 3 Broad It and Ring four Broad Business organisation Users groups. When you lot're finished, there should be three deployment ring groups.
Now that the groups have been created, add together the computers to the computer groups that align with the desired deployment rings. You lot tin do this through Group Policy or manually by using the WSUS Administration Console.
Apply the WSUS Administration Console to populate deployment rings
Adding computers to computer groups in the WSUS Administration Console is uncomplicated, but it could take much longer than managing membership through Group Policy, especially if you have many computers to add together. Calculation computers to reckoner groups in the WSUS Administration Console is chosen server-side targeting.
In this example, you add computers to computer groups in two unlike ways: past manually assigning unassigned computers and by searching for multiple computers.
Manually assign unassigned computers to groups
When new computers communicate with WSUS, they appear in the Unassigned Computers group. From there, you can employ the following process to add computers to their right groups. For these examples, you apply two Windows x PCs (WIN10-PC1 and WIN10-PC2) to add to the reckoner groups.
To assign computers manually
-
In the WSUS Assistants Console, become to Server_Name\Computers\All Computers\Unassigned Computers.
Hither, yous see the new computers that have received the GPO you lot created in the previous section and started communicating with WSUS. This example has only two computers; depending on how broadly you lot deployed your policy, you volition likely have many computers here.
-
Select both computers, right-click the selection, and and so click Change Membership.

-
In the Prepare Computer Group Membership dialog box, select the Band 2 Pilot Concern Users deployment band, and so click OK.
Considering they were assigned to a group, the computers are no longer in the Unassigned Computers group. If you lot select the Ring 2 Pilot Business organisation Users computer grouping, you lot volition run across both computers there.
Search for multiple computers to add to groups
Another way to add multiple computers to a deployment ring in the WSUS Administration Console is to use the search characteristic.
To search for multiple computers
-
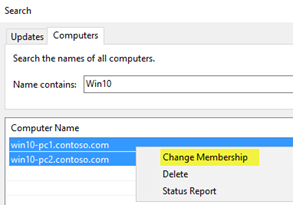
In the WSUS Administration Console, get to Server_Name\Computers\All Computers, correct-click All Computers, and then click Search.
-
In the search box, type WIN10.
-
In the search results, select the computers, right-click the pick, and then click Change Membership.
-
Select the Band iii Wide Information technology deployment ring, and and so click OK.
Y'all can now run across these computers in the Ring three Broad It computer group.
Apply Group Policy to populate deployment rings
The WSUS Administration Console provides a friendly interface from which you lot can manage Windows 10 quality and feature updates. When you need to add many computers to their right WSUS deployment ring, even so, information technology tin exist fourth dimension-consuming to practice so manually in the WSUS Administration Panel. For these cases, consider using Group Policy to target the correct computers, automatically calculation them to the correct WSUS deployment ring based on an Agile Directory security group. This procedure is called client-side targeting. Before enabling client-side targeting in Grouping Policy, you must configure WSUS to have Grouping Policy estimator assignment.
To configure WSUS to allow client-side targeting from Grouping Policy
-
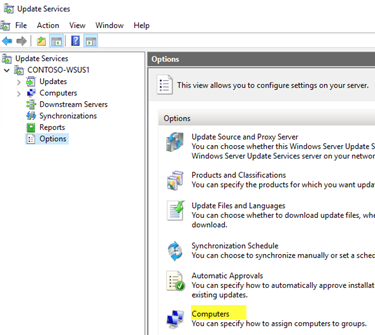
Open the WSUS Assistants Panel, and go to Server_Name\Options, and then click Computers.
-
In the Computers dialog box, select Employ Group Policy or registry settings on computers, and then click OK.
Note
This option is exclusively either-or. When yous enable WSUS to utilize Group Policy for group assignment, y'all can no longer manually add computers through the WSUS Administration Panel until yous change the option dorsum.
Now that WSUS is gear up for client-side targeting, complete the following steps to use Grouping Policy to configure client-side targeting:
To configure client-side targeting
Tip
When using customer-side targeting, consider giving security groups the same names as your deployment rings. Doing so simplifies the policy-cosmos procedure and helps ensure that you lot don't add together computers to the wrong rings.
-
Open Group Policy Management Panel (gpmc.msc).
-
Expand Forest\Domains\Your_Domain.
-
Correct-click Your_Domain, and and so click Create a GPO in this domain, and Link it here.
-
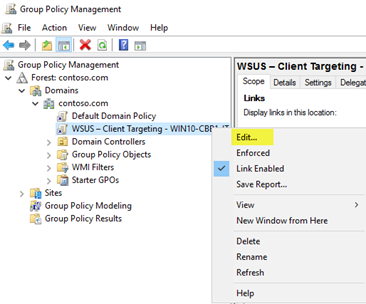
In the New GPO dialog box, type WSUS – Client Targeting – Band 4 Broad Business Users for the proper name of the new GPO.
-
Right-click the WSUS – Client Targeting – Band 4 Broad Business Users GPO, and and so click Edit.
-
In the Group Policy Management Editor, go to Computer Configuration\Policies\Administrative Templates\Windows Components\Windows Update.
-
Correct-click Enable customer-side targeting, and so click Edit.
-
In the Enable client-side targeting dialog box, select Enable.
-
In the Target group name for this calculator box, type Ring 4 Wide Business concern Users. This is the name of the deployment ring in WSUS to which these computers volition be added.
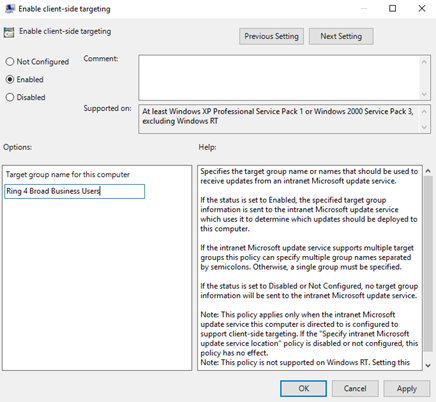
Warning
The target group name must lucifer the computer group name.
- Close the Group Policy Direction Editor.
Now you're ready to deploy this GPO to the correct estimator security group for the Ring four Broad Business Users deployment ring.
To telescopic the GPO to a group
-
In GPMC, select the WSUS – Client Targeting – Ring 4 Wide Business organization Users policy.
-
Click the Telescopic tab.
-
Under Security Filtering, remove the default AUTHENTICATED USERS security grouping, and so add the Ring four Wide Business Users grouping.

The adjacent time the clients in the Band 4 Broad Business Users security group receive their computer policy and contact WSUS, they will be added to the Band 4 Wide Business Users deployment band.
Automatically approve and deploy characteristic updates
For clients that should accept their feature updates approved as soon as they're bachelor, you can configure Automatic Approval rules in WSUS.
Note
WSUS respects the client device's servicing branch. If you corroborate a feature update while it is still in one co-operative, such equally Insider Preview, WSUS will install the update only on devices that are in that servicing branch. When Microsoft releases the build for the General Availability Channel, the devices in that will install information technology. Windows Update for Concern branch settings do not utilize to feature updates through WSUS.
To configure an Automatic Blessing rule for Windows client feature updates and approve them for the Ring 3 Wide It deployment band This instance uses Windows x, but the process is the aforementioned for Windows 11.
-
In the WSUS Assistants Console, go to Update Services\Server_Name\Options, and so select Automatic Approvals.
-
On the Update Rules tab, click New Rule.
-
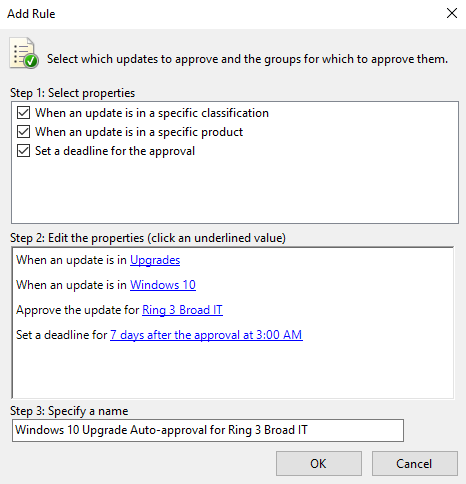
In the Add together Rule dialog box, select the When an update is in a specific classification, When an update is in a specific product, and Set a deadline for the blessing cheque boxes.

-
In the Edit the properties area, select any nomenclature. Articulate everything except Upgrades, and so click OK.
-
In the Edit the properties area, click the any product link. Clear all check boxes except Windows 10, and and then click OK.
Windows 10 is under All Products\Microsoft\Windows.
-
In the Edit the backdrop area, click the all computers link. Clear all the computer grouping cheque boxes except Ring 3 Broad IT, and then click OK.
-
Leave the deadline gear up for 7 days after the approval at 3:00 AM.
-
In the Step 3: Specify a name box, type Windows 10 Upgrade Automobile-approving for Band iii Broad It, and then click OK.
-
In the Automatic Approvals dialog box, click OK.
Notation
WSUS does not honor any existing month/week/twenty-four hour period deferral settings. That said, if you lot're using Windows Update for Business for a computer for which WSUS is likewise managing updates, when WSUS approves the update, it will exist installed on the calculator regardless of whether you configured Group Policy to wait.
Now, whenever Windows client feature updates are published to WSUS, they volition automatically be approved for the Ring iii Broad Information technology deployment band with an installation deadline of one week.
Warning
The machine approval dominion runs after synchronization occurs. This means that the next upgrade for each Windows client version will be canonical. If you lot select Run Rule, all possible updates that run into the criteria volition be approved, potentially including older updates that y'all don't actually want--which can be a trouble when the download sizes are very large.
Manually approve and deploy feature updates
You can manually approve updates and set deadlines for installation within the WSUS Assistants Console, also. It might be best to approve update rules manually after your pilot deployment has been updated.
To simplify the manual approving process, commencement by creating a software update view that contains only Windows ten (in this instance) updates. The process is the aforementioned for Windows 11 updates.
Annotation
If you approve more than i feature update for a reckoner, an error can event with the client. Approve but 1 feature update per computer.
To approve and deploy characteristic updates manually
-
In the WSUS Administration Console, become to Update Services\Server_Name\Updates. In the Action pane, click New Update View.
-
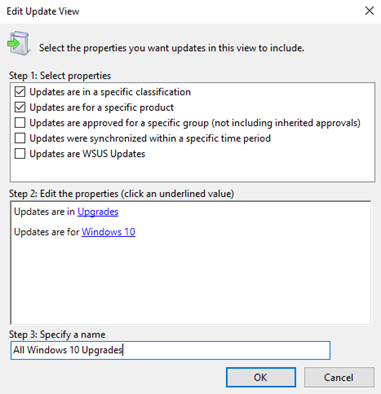
In the Add together Update View dialog box, select Updates are in a specific nomenclature and Updates are for a specific product.
-
Nether Step 2: Edit the properties, click any nomenclature. Clear all check boxes except Upgrades, and and so click OK.
-
Under Pace 2: Edit the properties, click any production. Clear all check boxes except Windows x, and then click OK.
Windows 10 is under All Products\Microsoft\Windows.
-
In the Step iii: Specify a name box, type All Windows 10 Upgrades, and so click OK.
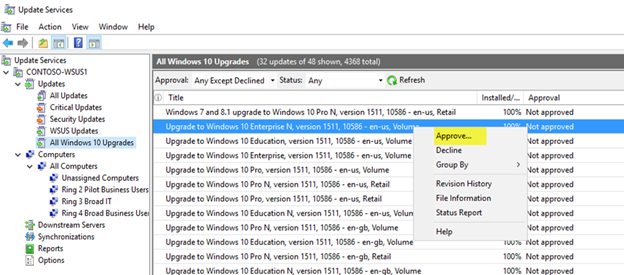
Now that y'all accept the All Windows ten Upgrades view, complete the following steps to manually approve an update for the Band four Broad Business Users deployment ring:
-
In the WSUS Administration Console, go to Update Services\Server_Name\Updates\All Windows 10 Upgrades.
-
Right-click the feature update you want to deploy, and then click Approve.
-
In the Approve Updates dialog box, from the Ring 4 Broad Business organization Users list, select Canonical for Install.

-
In the Corroborate Updates dialog box, from the Ring iv Wide Business organization Users list, click Borderline, click Ane Week, and so click OK.

-
If the Microsoft Software License Terms dialog box opens, click Accept.
If the deployment is successful, you should receive a successful progress report.

-
In the Approval Progress dialog box, click Close.
Steps to manage updates for Windows client
 | Learn about updates and servicing channels |
| | Set servicing strategy for Windows client updates |
| | Build deployment rings for Windows client updates |
| | Assign devices to servicing channels for Windows client updates |
| | Optimize update commitment for Windows client updates |
| | Deploy updates using Windows Update for Business or Deploy Windows customer updates using Windows Server Update Services (this topic) or Deploy Windows client updates using Microsoft Endpoint Configuration Manager |
Feedback
Submit and view feedback for
Source: https://docs.microsoft.com/en-us/windows/deployment/update/waas-manage-updates-wsus
Posted by: collinspostoomphom.blogspot.com
0 Response to "How To Configure Wsus Server 2016 To Get Updates From Another Wsus Server"
Post a Comment